 Audio
Audio 10W Old-Style ultra-compact Combo
Two inputs - Overdrive - Treble-enhancement
Circuit diagrams:
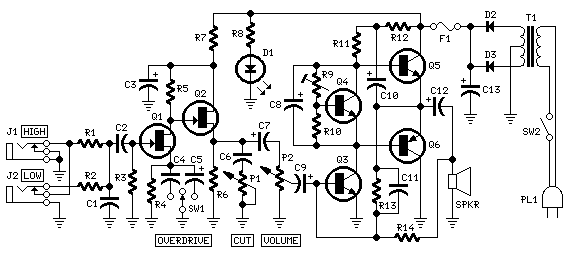
Parts:
P1 4K7 Linear Potentiometer
P2 10K Log. Potentiometer
R1,R2 68K 1/4W Resistors
R3 220K 1/4W Resistor
R4,R6,R11 4K7 1/4W Resistors
R5 27K 1/4W Resistor
R7 1K 1/4W Resistor
R8 3K3 1/2W Resistor
R9 2K 1/2W Trimmer Cermet
R10 470R 1/4W Resistor
R12 1K5 1/4W Resistor
R13 470K 1/4W Resistor
R14 33K 1/4W Resistor
C1 100pF 63V Ceramic Capacitor
C2 100nF 63V Polyester Capacitor
C3 470µF 35V Electrolytic Capacitor
C4 220nF 63V Polyester Capacitor (Optional, see Notes)
C5 47µF 25V Electrolytic Capacitor (Optional, see Notes)
C6 1µF 63V Polyester Capacitor
C7,C8,C9,C10 47µF 25V Electrolytic Capacitors
C11 47pF 63V Ceramic Capacitor
C12 1000µF 35V Electrolytic Capacitor
C13 2200µF 35V Electrolytic Capacitor
D1 5mm. Red LED
D2,D3 1N4004 400V 1A Diodes
Q1,Q2 2N3819 General-purpose N-Channel FETs
Q3 BC182 50V 200mA NPN Transistor
Q4 BD135 45V 1.5A NPN Transistor (See Notes)
Q5 BDX53A 60V 8A NPN Darlington Transistor
Q6 BDX54A 60V 8A PNP Darlington Transistor
J1,J2 6.3mm. Mono Jack sockets
SW1 1 pole 3 ways rotary switch (Optional, see Notes)
SW2 SPST Mains switch
F1 1.6A Fuse with socket
T1 220V Primary, 48V Center-tapped Secondary 20 to 30VA Mains transformer
PL1 Male Mains plug
SPKR One or more speakers wired in series or in parallel. Total resulting impedance: 8 or 4 Ohm. Minimum power handling: 20W
Circuit description:
The aim of this design is to reproduce a Combo amplifier of the type very common in the 'sixties and the 'seventies of the past century. It is well suited as a guitar amplifier but it will do a good job with any kind of electronic musical instrument or microphone.
5W power output was a common feature of these widespread devices due to the general adoption of a class A single-tube output stage (see the Vox AC-4 model).
Furthermore, nowadays we can do without the old-fashioned Vib-Trem feature frequently included in those designs.
The present circuit can deliver 10W of output power when driving an 8 Ohm load, or about 18W @ 4 Ohm.
It also features a two-FET preamplifier, two inputs with different sensitivity, a treble-cut control and an optional switch allowing overdrive or powerful treble-enhancement.
Technical data are quite impressive for so simple a design:
Sensitivity: 30mV input for 10W output
Frequency response: 40 to 20KHz -1dB
Total harmonic distortion @ 1KHz and 10KHz, 8 Ohm load: below 0.05% @ 1W, 0.08% @ 3.5W, 0.15% at the onset of clipping (about 10W).
Notes:
SW1 and related capacitors C4 & C5 are optional.
When SW1 slider is connected to C5 the overdrive feature is enabled.
When SW1 slider is connected to C4 the treble-enhancer is enabled.
C4 value can be varied from 100nF to 470nF to suit your treble-enhancement needs.
In all cases where Darlington transistors are used as the output devices it is essential that the sensing transistor (Q4) should be in as close thermal contact with the output transistors as possible. Therefore a TO126-case transistor type was chosen for easy bolting on the heatsink, very close to the output pair.
To set quiescent current, remove temporarily the Fuse F1 and insert the probes of an Avo-meter in the two leads of the fuse holder.
Set the volume control to the minimum and Trimmer R9 to its minimum resistance.
Power-on the circuit and adjust R9 to read a current drawing of about 25 to 30mA.
Wait about 15 minutes, watch if the current is varying and readjust if necessary.
Author: RED Free Circuit Designs
Email:
Website: http://www.redcircuits.com/


