 Audio
Audio Description:
This circuit has an adjustable output timer that will re-trigger at regular intervals. The output period can be anything from a fraction of a second to half-an-hour or more - and it can be made to recur at regular intervals of anything from seconds to days and beyond.
Circuit diagram
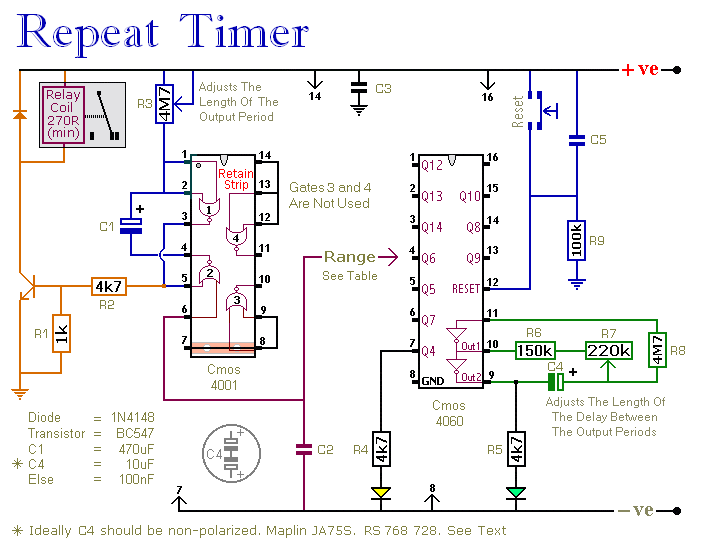
The Output Section:
The output section is a simple Monostable Circuit. When Pin 6 of the Cmos 4001 is taken high - the monostable triggers - and the relay energizes. It will remain energized for a period of time set by C1 & R3.
With the values shown - R3 will provide output periods of up to about 30-minutes. However, you can choose component values to suit your requirements. For example, if you reduce R3 to 1meg - and C1 to 4.7uF - the maximum output period is between 3 and 5 seconds. Owing to manufacturing tolerances - the precise length of the time period available depend on the characteristics of the actual components you've used.
The Cmos 4060:
The Cmos 4060 is a 14-bit binary counter with a built-in oscillator. The oscillator consists of the two inverters connected to Pins 9, 10 & 11 - and its frequency is controlled by R7. The output from the oscillator is connected internally to the binary counter. While the oscillator is running - the IC counts the number of oscillations - and the state of the count is reflected in the output pins.
By adjusting R7 - you can set the length of time it takes for any given output pin to go high. Connect that output to Pin 6 of the Cmos 4001 and - every time it goes high - it'll trigger the monostable.
Ideally C4 should be non-polarized - but a regular electrolytic will work - provided it doesn't leak too badly in the reverse direction. Alternatively - you can simulate a non-polarized 10uF capacitor by connecting two 22uF capacitors back to back - as shown.
Veroboard Layout:

Since the delays between outputs can last for hours - or even days - using "Trial and Error" to set-up the timer would be very tedious. A better solution is to use the Setup Table provided - and calculate the time required for Pin 7 of the Cmos 4060 to go high.
For example, if you want the monostable to trigger every Six Hours - the Range Table tells you to use Pin 1 of the Cmos 4060. You need Pin 1 to go high every 6 x 60 x 60 = 21 600 seconds. The Setup table tells you that for Pin 1 you should divide this figure by 512 - giving about 42 seconds. Adjust R7 so that the Yellow LED lights 42 seconds after power is applied. This will cause Pin 1 to go high after about 3 Hours.
Setup Tables:

When Pin 1 goes high it will stay high for three hours. It will then go low for three hours - before going high once again. Thus, Pin 1 goes high once every six hours. It's the act of going high that triggers the monostable. So - after an initial delay of three hours - the relay will energize. It will then re-energize every six hours thereafter.
The reset button should NOT be used during setup. The time it takes for Pin 7 to go high - and the Yellow LED to light - MUST be measured from the moment power is applied.
Although R4, R5 and the two LEDs help with the setup - they are not necessary to the operation of the timer. If you want to reduce the power consumption - disconnect them once you've completed the setup.
The timer is designed for a 12-volt supply. However - provided a suitable relay is used - it will work at anything from 5 to 15-volts. Applying power starts the timer. It can be reset at any time by a brief interruption of the power supply - so a reset button is not strictly necessary. If you need delays in excess of 32-hours - increase the value of C4.
The Support Material for this circuit includes a step-by-step guide to the construction of the circuit-board - a parts list - a detailed circuit description - and more.
Author: Ron J
Email:
Website: http://www.zen22142.zen.co.uk


