 Audio
Audio 0) Basic information
This card is a "season type" interface card to connect your PC to your satellite decoder. Using programs like "Decrypt" you will be able to view a number of encoded transmissions in Videocrypt and D2MAC.
This Mk2 card can be built in different configurations, depending on your needs.
a) Basic card, only need the max232, 7407 and C1-C5.
b) Optional overcurrent protection, add the zener and the resistor.
c) Optional leds for monitoring different functions.
d) Optional external DC supply, only needed if you have a decoder which
does not supply sufficient power to the IC's and the leds.
e) Optional smartcard socket if you want to look at the datastream from
a smartcard.
f) Adding all options you will have the complete card.
1) Making the Printed Circuit Board.
If you have access to a HP laserprinter:-
Download the file DVC2_PRN.ZIP. ( I hope to include some other common printers later. )
Unpacking this you will find a file named HP_200.prn. If you are working under Windows 3.x or Windows95 you now need to open a dos window. Goto the directory containing HP_200 and enter the following command: "copy /b hp_200.prn lpt1" and press enter. You may change lpt1 to suit whichever port your printer is connected to.
If you prefer to use Windows for the above you need to use a program which will allow you to copy a file directly to the printer port. If you do not have a program to do this please load prfile10.zip and follow the instructions contained within.
If you do not have access to a HP laserprinter:-
Download the file 004.ZIP. This contains the original drawings.These are larger than required and will have to be scaled down. A quality graphics program will do the job. The width should be 54.0 mm at the narrowest point and the length 160mm. There are a few good programs which may be used to do the rescaling.
Try one of the following :-
Lotus Freelance, a trial version of which should be available from http://components.lotus.com/26f2.html.
Paint Shop Pro, a trial version should be available from
http://www.jasc.com. Microsoft Image Composer, a trial version should be available from
http://www.microsoft.com/msdownload/micsetup.htm. Load the image into one of the above packages and print it out.
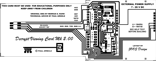

You should now have, on paper, a copy of the printed circuit board layout.
Check the printout is correct by measuring the width and length. The mirrored Card layout should be 54mm x 160mm. The width is very important but the length can be allowed to vary by +/- 1mm.
A 600 dpi laserprinter is reccommended for the printout to be in good quality.
If the test printout is correct you can now print the file again onto plastic foil or film (overhead projection film).
You will need a piece of 0.8 mm thick photo printed circuit board. This can be a little difficult to find but should be available from the better hobby electronic stores.
Describing the etching process is beyond the scope of this document. If you know how, there is no need, and if you don't, then get somebody to do it for you. Simple etching kits can be bought from the better hobby electronic stores. Be careful and remember that the chemicals used can be dangerous.
After the board is etched, drill the holes for the components. Drill a little hole in the tiny squares as well, these are the holes for fastening the cable from the PC. You can choose which side you
want for feeding the cable from the PC. Four larger holes are required for the smartcard socket mounting lugs, or you can cut off the lugs from the smartcard socket and use only the soldering for fastening. Using this metod you will not have to drill the four holes.
Cut the edges cleanly and accurately and sand them a little, always remember the final width of 54.0 mm (this is extremely important).
Your circuit board is now ready to have the components fitted.
2) Component list.
---------------------------------------------------------------------
The RS-stock numbers are given as a reference.
You may find cheaper prices elsewhere.
Basic Card
1 IC SN7407N RS: 306-336
1 IC MAX232CPE RS: 655-290
1 14 Way IC Socket RS: 447-314
1 16 Way IC Socket RS: 447-320
5 Capacitors 0.1 uF (C1-C5) RS: 116-953
1 WIRE LINK
* x m. Cable 4 conductors RS: 362-651
*1 9 Way Com connector RS: 472-843
*1 9 Way Hood RS: 484-789
*1 25 Way Com connector RS: 470-904
*1 25 Way Hood RS: 484-802
* To fit your PC's Com port.
---------------------------------------------------------------------
Option: External power supply
1 LM2937ET-5.0 5V regulator RS: 853-371
1 Capacitor 0.1 uF (C6) RS: 125-733
1 Capacitor 33uF (C7) RS: 844-838
4 1N4004 Diodes RS: 261-176
3 1N4148 Diodes RS: 271-606
1 Heatsink FARNELL: 110240 or 110241
(100240 will fit straight away,
110241 needs trimming but will look nicer)
1 2.1mm DC socket RS: 486-662
---------------------------------------------------------------------
Option: Smartcard socket
1 Smartcard socket RS: 453-785
---------------------------------------------------------------------
Option: Overcurrent protection.
1 Zener diode 5.6 Vz RS: 283-665
1 Resistor 2.2 kOhm RS: 149-739
---------------------------------------------------------------------
Option: Leds for VCC, EXTERNAL SUPPLY AND DATA .
3 Leds with integrated resistor, choose colour to fit your decoder.
Green RS: 197-104
Red RS: 197-097
Yellow RS: 197-110
---------------------------------------------------------------------
*********************************************************************
This Guide is written for building the complete card, leave out the
parts not needed for you.
*********************************************************************
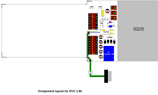
Solder the components to the circuit board leaving the IC's until last. The position of the components is shown in the drawing DVC200_C.BMP.
Start by soldering two links between the points marked d-d and g-g. Use trimmings from earlier work, or cut a little piece from the diodes, you will have to trim these later.
Take care to mount the capacitors with the correct polarity. You will find a '+' on the circuit board to guide you. Note that C6, while having the same value as C1-C5 is infact different.
The 1N4004 diodes fit in the positions marked by 'A'. The two outer diodes should have their cathodes (marked by a ring at one end) towards the middle of the board, the middle two diodes should have their cathodes towards the edge of the board.
All three 1N4148 diodes should be mounted with their cathodes pointing away from the smartcard connector. If you are building the basic card, ie without the external supply, you don't need to fit any of the 1N4148 diodes. Instead you need to fit a wire link in place of the diode which normally connects to the track marked VCC, it also connects to one of the pins on the
smartcard socket. This link must be replaced by a diode if you upgrade the card in the future.
Be carefull to fit the LM2937 the correct way round. This is with the black box pointing to the middle of the board. Remember to mount the heatsink before you solder the LM. Mount the heatsink to the LM, then bend the three legs of the LM where they start to become thinner.
Bend them 90 degrees towards the black box so that the LM will fit over the middle of the board with the heatsink on top.
If you choose to fit the optional zener diode, the cathode (marked by a ring at one end) should be connect to the 2.2kOhm resistor.
If you choose to mount the optional leds you will find a mark on them, this pin is the cathode and should be placed in the hole connected to ground for the V and E diodes, and the feed from the SN7407N for the D diode. These diodes must be mounted pointing upwards.
Solder the cable conductors to the circuit board
Colour A to GND
Colour B to RXD
Colour C to DCD
Colour D to TXD
Fasten the cable to the printboard using thin metal threads which you twist and glue on the backside.
Connecting the cable to the Com connector
---------------------------------------------------------------------
9 way version
Solder the conductors to the backside of the socket.
Colour A to Pin no 5
Colour B to Pin no 2
Colour C to Pin no 1
Colour D to Pin no 3
Link pins 4-6-8 together and mount the hood.
---------------------------------------------------------------------
25 way version
Solder the conductors to the backside of the socket.
Colour A to Pin no 7
Colour B to Pin no 3
Colour C to Pin no 8
Colour D to Pin no 2
Link pins 5-6-20 together and mount the hood.
---------------------------------------------------------------------
Mounting the two IC's. Ground yourself to get rid of any static electricity.
Carefully place each IC into the correct socket ensuring that pin 1 is in the correct place.
You will find a '1' on the circuit board to guide you.
And now your Decrypt card is ready for use. Congratulations !
The card can either be used as a normal PC-Decoder interface card or, with a card inserted in the card socket, can also be used to log the data flowing between the decoder and a smartcard.
I hope to release a data logging program at some point in the future. It will be placed on my homepage when ready. In the mean time there are a number of logging programs which will
work with this interface card.
If your decoder cannot supply enough current to drive the interface circuit and a card you can use an external DC supply connected using the 2.1mm socket. The polarity of the connector does not matter, it will work either way round. The DC supply should be in the range 7V-26V.
PLEASE NOTE:
IF you alter the drawings in any way, they will no longer be the drawings to the DECRYPT VIEWING CARD Mk2. For that reason I ask that you delete all non electronic information from the card layout!
IMPORTANT NOTICE
----------------
The Decrypt Viewing Card contains several small parts which are easily broken off, these could be harmful to children. For this reason we ask that you keep this card away from children.
Also, be careful when handling your DVC close to the TV set. Apart from the damage that can occur to DVC due to static from the TV screen you may also receive a nasty shock.
JANUARY 1997
JOOS DESIGN and PAUL ARNOLD
This card must only be used to watch TV-channels for which you have a legal subscription. It may also be used in some countries to view channels which cannot be subscribed to (eg Filmnet in the UK). Watching encoded TV-channels you have not paid for is illegal in most countries.
Good luck with your hobby.
Author: JOOS DESIGN and PAUL ARNOLD
Email:
Website: http://www.electronics-lab.com


