 Audio
AudioThis simple circuit uses an incandescent lamp to detect airflow. With the filament exposed to air, a constant current source is used to slightly heat the filament. As it is heated, the resistance increases. As air flows over the filament it cools down, thus lowering it's resistance. A comparator is used to detect this difference and light an LED. With a few changes, the circuit can be connected to a meter or ADC to provide an estimation on the amount of air flow.
Circuit diagram
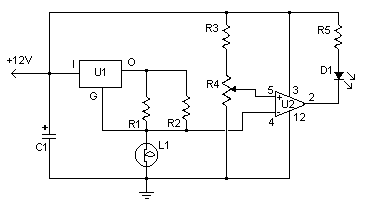
Parts:
R1 100 Ohm 1/4W Resistor
R2 470 Ohm 1/4W Resistor
R3 10k 1/4W Resistor
R4 100K 1/4W Resistor
R5 1K 1/4W Resistor
C1 47uF Electrolytic Capacitor
U1 78L05 Voltage Regulator
U2 LM339 Op Amp
L1 #47 Incandescent lamp with glass removed (See "Notes")
D1 LED
MISC Board, Wire, Sockets for ICs, etc.
Notes:
1. The glass will have to be removed from L1 without breaking the filament. Wrap the glass in masking tape and it in a vise. Slowly crank down until the glass breaks, then remove the bulb and carefully peel back the tape. If the filament has broken, you will need another lamp.
Author:
Email:
Website: http://www.aaroncake.net


